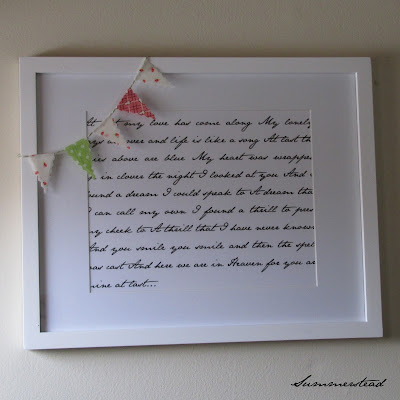
All last week, Kindra hosted her 2nd annual Be Mine Bonanza. If you missed it, you really should check it out! It was seven days of talented ladies showing off some wonderful Valentine's Day inspired crafts. Tuesday was my turn to show off what I made. Focusing more on the romance of Valentine's Day, this is what I came up with...
Last year, I showed you how to make some pillow forms and pillow covers. This time, I decided to do something a little different. Thinking of the kinds of things I love (simplicity, all things vintage, history) and things that I don't particularly care for (lots of heartsy stuff), I came up with some wall art that is inspired by old letters, including a letter my great-grandpa wrote to my great-grandma during WWI.
Today, I'm going to show you how I created both versions above.
For the one on the left, you will need:
12x12 Scrapbooking Frame
12x12 Scrapbooking Paper
8x11 Scrapbooking Paper or Printer Paper
Tape
Xacto Knife & self healing mat
Ruler
Pencil
Printer
Embellishments
First, if your frame is black (like mine), but you want it a different color (like I did), just spray paint it. Decide on a poem or song that you like. I chose Etta James' "At Last" because that was the first song my husband and I danced to. Below, you'll find some links to PDF's for At Last, What A Wonderful World, I'll Be Seeing You, It Had To Be You, As Time Goes By, and It's Been A Long Long Time. Or type and print your own (font and template info found below). I printed mine on some textured card stock, and I love the way it turned out.
Take your 12x12 scrapbooking paper, measure and mark lines 2-3 inches from each side. I did mine at 2 inches, but I wish I would have gone with 2.5 or 3 inches.
With your Xacto knife (or scissors), cut the middle out. Take your printed song, center it (it's okay if the words on the edges don't completely show), and tape it in place. If you have a little bit hanging over the bottom, just cut it off. Add any embellishments, attach your paper to the frame backing, and pop it all into the frame.
For the frame on the right, you will need:
11x14 frame with 8x10 mat
18" Baker's twine
Heat & Bond
Fabric
Paper, ruler, scissors, and pencil for making template
First, you will need to pick out your song that you want, then print and frame it like you would a picture. I printed mine on plain white cardstock.
Now, the no-sew mini bunting. Cut a piece of paper at 1x3 inches. Then, mark the half way points on each side, and draw a diamond shape using the halfway marks as a guide, and cut the diamond out.
Next, cut (5) 1x3 strips of Heat & Bond. Iron the shiny/non-papery side of the Heat & Bond strips to the wrong side of your fabric(s) and cut them out.
Then, trace the diamond onto the papery-side of the Heat & Bond, and cut out your shapes. If you want scalloped edges like mine, you'll need to use pinking shears or a pinking rotary blade. With wrong sides together, fold your fabric diamonds in half, and iron the bottom half. Slip on to your baker's twine, and iron the rest. I spaced my mini pennants about 1/2 inch apart. Since the bunting is light enough, you can just tape it to the back of your frame.
I've already printed out the lyrics to some of my (and my family's) favorite songs that I plan to periodically switch out. I'll also change the background & embellishments in the first frame, and the bunting on the second one to fit the song and/or season!
Sources, Costs, and Notes:
For the printed song in the first frame, I used the "Justify" alignment, and knocked the margins down to .5. You may also have to adjust the header and footer (I set mine at .3)
Font - Jane Austen, free from dafont.com
12x12 Frame - Hobby Lobby, $19.99
12x12 Paper - Hobby Lobby, 59¢
8x11 Paper - Hobby Lobby, 39¢
11x14 Frame with mat - Walmart, $14
Baker's Twine - Bella Creationz, $8.95/160 yards
Fabric - my personal stash
Heat & Bond - Hobby Lobby, about $3/yard, I think
At Last - Vertical Horizontal
What A Wonderful World - Vertical Horizontal
I'll Be Seeing You - Vertical Horizontal
It Had To Be You - Vertical Horizontal
As Time Goes By - Vertical Horizontal
It's Been A Long, Long Time - Vertical Horizontal
At Last - Vertical Horizontal
What A Wonderful World - Vertical Horizontal
I'll Be Seeing You - Vertical Horizontal
It Had To Be You - Vertical Horizontal
As Time Goes By - Vertical Horizontal
It's Been A Long, Long Time - Vertical Horizontal
Thanks again, Kindra for hosting this event, and inviting me to be a part of it! And, thanks to all of you for checking out this lil tutorial o' mine!


