Home *** Tutorials *** Library *** Kitchen *** About Me *** Contact Me *** FAQ


Showing posts with label tutorials. Show all posts

Wednesday, February 8, 2012

Board and Batten Coat Hooks

My husband informed me that he wants a coat rack by the front door.  A free standing coat rack.  I nearly laughed in his face.

A free standing coat rack?  In our house?  He clearly forgot who he's living with.  It would be used not only for hanging our coats and hats, but also as a toy, a weapon, and it'd be the perfect sized chew toy for Bernie (our St. Bernard, whose real name is Odin).  I imagine that a few windows would be taken out, and our interior walls would have a few windows put in.

Before he could go pick out something horrendous, I got busy and made this:


First, I marked off the area where I wanted the B&B, and painted the wall in that area.

The wood was VERY hard, so I pre-drilled the holes.  Since I was using finishing nails to attach the 1/2 x 2s, I drilled 3 tiny holes in each board.  On the 1/2 x 4, I laid out the hooks where I wanted them, and marked the screw holes to attach the hooks to the wood.  After drilling those holes, and using the hooks as a guide, I drilled a 3rd hole centered below each set of the hooks' holes.


I measured 4 feet up from the top of the baseboards, centered, and leveled the 1/2 x 4, and screwed it into place.  On each end, I attached the rosettes.  I know I should have used finishing nails on those, but I didn't.  I was worried about being able to see the nails too well, so I used carpet tape!

I then nailed one 1/2 x 2 on each end, just under the rosettes.


With the third, I centered it under where the middle hook was going to go, and put it there.  I screwed in the hooks, and I was done!


Sources, Costs, & Notes:
1/2 x 4 (3 feet long) - Menards, $3
1/2 x 2 (4 feet long) - Menards, $3 each
3-1/2 Rosettes - Menards $3 each
Hooks - Walmart, $2.27 each
Paint Color - Muslin by Color Place (Light Base, Formula: C-2, T-4, L-8)

You could easily make this cheaper.  The wood I used was a higher grade and well sanded wood because they had it in the perfect size that I was looking for when doing this small project.  If I had done a larger area, I would have used either MDF or lower quality 1x4s and 1x2s.  Also, the only rosettes available in the size I needed were in wood.  MDF versions are cheaper.

Monday, January 30, 2012

Love Letters

All last week, Kindra hosted her 2nd annual Be Mine Bonanza.  If you missed it, you really should check it out!  It was seven days of talented ladies showing off some wonderful Valentine's Day inspired crafts.  Tuesday was my turn to show off what I made.  Focusing more on the romance of Valentine's Day, this is what I came up with...

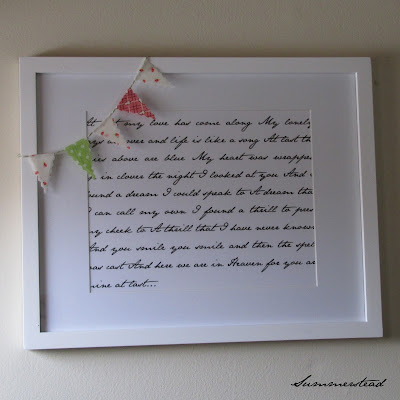
Last year, I showed you how to make some pillow forms and pillow covers.  This time, I decided to do something a little different.  Thinking of the kinds of things I love (simplicity, all things vintage, history) and things that I don't particularly care for (lots of heartsy stuff), I came up with some wall art that is inspired by old letters, including a letter my great-grandpa wrote to my great-grandma during WWI.


Today, I'm going to show you how I created both versions above.

For the one on the left, you will need:
12x12 Scrapbooking Frame
12x12 Scrapbooking Paper
8x11 Scrapbooking Paper or Printer Paper
Tape
Xacto Knife & self healing mat
Ruler
Pencil
Printer
Embellishments

First, if your frame is black (like mine), but you want it a different color (like I did), just spray paint it.  Decide on a poem or song that you like.  I chose Etta James' "At Last" because that was the first song my husband and I danced to.  Below, you'll find some links to PDF's for At Last, What A Wonderful World, I'll Be Seeing You, It Had To Be You, As Time Goes By, and It's Been A Long Long Time.  Or type and print your own (font and template info found below).  I printed mine on some textured card stock, and I love the way it turned out.

Take your 12x12 scrapbooking paper, measure and mark lines 2-3 inches from each side.  I did mine at 2 inches, but I wish I would have gone with 2.5 or 3 inches.

I apologize for the poor quality photo - not a good day for taking pictures!

With your Xacto knife (or scissors), cut the middle out.  Take your printed song, center it (it's okay if the words on the edges don't completely show), and tape it in place.  If you have a little bit hanging over the bottom, just cut it off.  Add any embellishments, attach your paper to the frame backing, and pop it all into the frame.


For the frame on the right, you will need:
11x14 frame with 8x10 mat
18" Baker's twine
Heat & Bond
Fabric
Paper, ruler, scissors, and pencil for making template

First, you will need to pick out your song that you want, then print and frame it like you would a picture.  I printed mine on plain white cardstock.

Now, the no-sew mini bunting.  Cut a piece of paper at 1x3 inches.  Then, mark the half way points on each side, and draw a diamond shape using the halfway marks as a guide, and cut the diamond out.


Next, cut (5) 1x3 strips of Heat & Bond.  Iron the shiny/non-papery side of the Heat & Bond strips to the wrong side of your fabric(s) and cut them out.


Then, trace the diamond onto the papery-side of the Heat & Bond, and cut out your shapes.  If you want scalloped edges like mine, you'll need to use pinking shears or a pinking rotary blade.  With wrong sides together, fold your fabric diamonds in half, and iron the bottom half.  Slip on to your baker's twine, and iron the rest.  I spaced my mini pennants about 1/2 inch apart.  Since the bunting is light enough, you can just tape it to the back of your frame.


I've already printed out the lyrics to some of my (and my family's) favorite songs that I plan to periodically switch out.  I'll also change the background & embellishments in the first frame, and the bunting on the second one to fit the song and/or season!

Sources, Costs, and Notes:
For the printed song in the first frame, I used the "Justify" alignment, and knocked the margins down to .5.  You may also have to adjust the header and footer (I set mine at .3)
Font - Jane Austen, free from dafont.com
12x12 Frame - Hobby Lobby, $19.99
12x12 Paper - Hobby Lobby, 59¢
8x11 Paper - Hobby Lobby, 39¢
11x14 Frame with mat - Walmart, $14
Baker's Twine - Bella Creationz, $8.95/160 yards
Fabric - my personal stash
Heat & Bond - Hobby Lobby, about $3/yard, I think
At Last - Vertical  Horizontal
What A Wonderful World - Vertical  Horizontal
I'll Be Seeing You - Vertical  Horizontal
It Had To Be You - Vertical  Horizontal
As Time Goes By - Vertical  Horizontal
It's Been A Long, Long Time - Vertical  Horizontal

Thanks again, Kindra for hosting this event, and inviting me to be a part of it!  And, thanks to all of you for checking out this lil tutorial o' mine!

Thursday, January 12, 2012

What's for Dinner?


Every weekday, between 4:00-5:30, I hear "What's for dinner?" at least 6 times (more on weekends). Keep in mind there are only 4 of us who live here, and I almost never have to ask myself this question.  So, yeah.  Because everybody thinks they're starving all the time, and nobody listens, I have to answer the same question a minimum of half a dozen times in an hour.  I'm hoping that since we can all read, I will not longer have to answer, "What's for Dinner?"  Instead, I'll get a workout as I constantly point to our new menu board!

I used the same, super easy method that I used for my Perpetual Calendar and the boys' Chore Charts.

Supplies Needed:
10x13 Frame
2 sheets 12x12 scrapbooking paper
Printer & Printer paper
Scissors
Dry Erase Marker
Glue/Double stick tape
Regular scotch tape
Ruler & pencil (or paper cutter with ruler if you have one)

Cut the "header" paper (the green paper I used behind the M-E-N-U letters) so that it measures 3 x 10 inches.

Cut the body paper so that it measures 10 x 10½ inches.

Print and cut your letters.

Take the back off your frame, and lay your body paper in the frame so it butts up against the bottom.  Then lay the header paper in so it butts up against the top of the frame.  Tape the 2 pieces of paper together where they overlap.  Mine overlapped about ½ an inch.

Take the papers out of the frame, and attach your letters.  Pop it back in the frame, attach the back of the frame, and you're done!


Sources, Notes, & Costs:
Frame - Walmart, $5
Scrapbooking Paper - Hobby Lobby 59¢ each (I got them on sale for 1/2 off)

To download and print a PDF with the letters I used, click here.  The smaller letters are 1 inch circles, so if you have a punch that size, it'll make it go a lot faster!

**I think I fixed the PDF link so you don't have to log in or create an account in order to be able to us it.  Sorry for the inconvenience!**

Monday, November 21, 2011

Simple Tree Skirt Tutorial

Thanksgiving is only days away, which means Christmas is right around the corner! Every year, I go in search of the perfect tree skirt for our tree. I want something pretty, but really busy, and I want it to be reasonably priced. I've never been able to find a tree skirt that fit all three criteria, so I decided to make my own.

*I have actually added a really cute pleated trim since this picture was taken.  I'll get a new picture taken soon.  It just adds an extra bit of prettiness!*

This tutorial is for a tree skirt that measures about 36” in diameter. For mine, I decided to use only a single layer of fabric, but I’ll include instructions for a skirt with a top, batting, and underside.

Materials:
1 1/8 - 2¼ yards fabric, pre-washed
If you want a different fabric for the top and bottom of the skirt, you’ll need about 1 1/8 yards of each fabric.
1 Fat Quarter, pre-washed OR 3½ yards bias tape
Coordinating Thread
Batting (optional)
Pencil
String
Ruler & Yard stick

Instructions:
1. Fold your fabric in half, right sides together. Then fold in half again.

2. From the folded corner, measure out 18” along each side, and a few spots between the two sides. Make a mark at each spot.

3. Tie your string to your pencil. Place your pencil on one of your marks, then pull the string to the corner. 
Hold the string in the corner while you draw the lines from dot to dot. I found it is easier to make short dashes instead of one long line.

4. Cut along your line through all four layers.

5. We have an artificial tree, so my inner circle is only 1¼” diameter. (If you have a real tree, you will want to make yours larger. Just measure the diameter of your trunk and divide that in half to figure how far from the corner you need to measure for the inner circle.) From the corner, measure out about ¾” and make your marks.

6. Draw your lines to connect the dots.
 
7. Cut out the inner circle, then unfold your skirt half way.

8. Slip your scissors between the two layers, and cut along one folded edge from the outside to the inner circle.


9. If you want to add any kind of embellishments, appliqués, reverse appliqués, etc to the top of your skirt, now is the time to do it.


If you’re just doing a single layer, skip to #12.

10. This is a quick and easy way to cut the batting (you can also use old towels, mattress pads, etc) and backing fabric. Lay the backing fabric right side down. Layer the batting and top of tree skirt, and pin together.

11. Using the skirt top as your pattern, simply cut around it through the batting and backing fabric.

You can go here to find a tutorial I posted a while back on how to get several yards of bias tape from just one fat quarter.

12. Once you have your bias tape ready, all you have to do is sew it along the rough edges, and you’re done!


Friday, October 7, 2011

Day 7 - Cloth Napkins with Mitered Corners

We go through napkins and paper towels like nobody's business. I try to buy recycled products, but it gets expensive having to buy these paper products so often.

I am also a fabric addict. Part of my journey to trying to find harmony in my home is to become more organized and declutter. So, obviously, my napkin dilemma has provided me with a wonderful opportunity. I am going to make napkins. Lots and lots of napkins.

They are really easy to make, even the mitered corners!


First, you need to decide how big you want them.  Mine are 15"x16" because when I fold them, they fit perfectly into my basket.  The napkins you can get at Pottery Barn & Anthropologie are 20" square.

Once you've decided this, you will need to cut your fabric 1" larger on all sides than you want your finished napkin.  For example, you will need to cut fabric for a 20" napkin at 22" square.

Side note: I used 1/4" hems on my napkins, so that is what the pictures will show.  However...1/2" hems will make the mitered corners MUCH easier, so that is the measurement I'm using for this tutorial.


On all four side, fold and press a 1/2" hem.


Fold and press again.

Now for the mitered part...
Looks like I missed a space in there!  It's suppose to read
"1. Open your hems, then cut at the cut line."

Once the hems are folded back over, you can pin and sew around your napkin.  
Your corners should look like this:

 Now enjoy your new, custom (and earth friendly) napkins!


I can't wait to pick up some linen to make some embroidered linen napkins!

Just a couple of other notes...
I have found that 100% cotton fabrics work best.  Be sure to wash and dry your fabric as though it was already your napkins BEFORE you start cutting.  The fabric will shrink, so it's best to have it do that before you've cut and sewn it!
To make (4) 20" napkins, I would recommend getting about 1-1/2" yards of 45" wide fabric.


Sunday, October 2, 2011

Day 2 - A Little Tutorial for You

I LOVE those mirrored stars that I would see in Pottery Barn and Ballard Designs catalogs, but $200 (give or take a little) is way more than I'm willing to spend. Hobby Lobby had some, but they still weren't cheap enough for me (even with a 40% off coupon)!

So, I thought about why I like the stars. I realized I was drawn to them not as usable mirrors, but as accent pieces, and I really liked the contrast between the mirror and the dark outlines. So was the mirrored part really all the important? Mmmm...probably not.


I used...
An old star that used to hang outside,
Oil Rubbed Bronze spray paint left over from my bed redo,
Some silver spray paint I had on hand,
and painter's tape.


After cleaning off all the dust & stuff, I put 2 coats of Oil Rubbed Bronze spray paint on the star.  Once both coats were dry, I added the tape.  I measured 1/4" from each edge, and added my tape.  It was a little time consuming, so I got lazy and started eyeballing the measurements.  They turned out pretty good, though!


I then added 2 coats of silver spray paint, waited for those to dry, and peeled the paint off.

Here is the finished product, right at home!

While I do like the way it turned out, I think I need a little more sparkle in the silver. I think that can be fixed with a little chrome spray paint. Until I can remember to pick some up, I believe our new old start will do just fine.  For now, I think it looks great, especially since it didn't cost me anything!

Now, how does this tie in to my 31 Days? It's helping me live a little more harmoniously with my house, and my pocketbook loves the cost! If you can't afford something you love, improvise. There's no reason any of us shouldn't have beautiful homes just because we can't or don't want to spend a lot of money.

I will also be linking up to some of these parties!

Wednesday, September 28, 2011

Photo Names

A couple of years ago, I made the Christmas gifts for my parents and in-laws. I posted about them here, but forgot to put the tutorial on my tutorial page (Thanks fo the heads up, MK!). Oops! Instead of making you go back and find the original post, I'm going to do a new one right here - and put it on my tute page!


I loved the ones I made for the grandparents so much, that I had to make one for us, too!  I found the letters at Hobby Lobby, and got them on sale for about $1 each.  They were in the unfinished wood department, and I spray painted them white.  The frames were found at Gordman's (a discount retail store like Marshall's or TJ Maxx) for about $15, and the pictures were developed at Wal-Mart.  Every year, we take new pictures to replace the old (I forgot to switch out our pictures, though!), so the grandparents get updated pictures every year.  For my parents and in-laws, we include all of their respective grandkids - not just my boys!

Linking up to some of these parties.

Monday, September 19, 2011

Crayon Art & Crepe Paper Flowers - a tutorial

If you're on Pinterest, there's a really good chance you've seen these melted crayon works of art.


The boys and I made our pictures before I bought the frames.  I would suggest buying the frames first, so you know just how far the crayons need to be from the edges to fit in the frames.  I had to do some serious sanding on my frame, and the boys could have added another crayon to their pictures.

We were so excited to try this, that I forgot to take pictures (again!), but it's really easy.
What you'll need:
Canvas
Crayons (enough to cover 1 edge of your canvas)
Elmer's Glue
Blow Dryer and/or Space Heater
Wax Paper or newspaper
Small jar (I used one of these)

1.  Put your canvas in your frame.  Use painter's tape to mark the edges of the frame on your canvas. 

2.  Take the canvas out of the frame & using more painter's tape, meet the edges of Step 1's tape.


3.  Remove the tape from Step 1.  You now know where you can put your crayons.

4.  Pick out your crayons.  We used 21 crayons for ours.  It was the perfect number for my frame, but we probably could have squeezed in a 22nd crayon for the boys.

5. On your work surface, line up your crayons the way you want them on your canvas.  Then, start applying the glue to your canvas, and add your crayons.

6.  Introduce your kids to some of your favorite big band songs, and dance around with them while waiting for the glue to dry.  It doesn't take long, about 10-15 minutes.

7.  Lay down some newspaper (we used a hand towel with some waxed paper on top), and prop the crayon side of your canvas up on your short jar.  With your space heater and/or blow dryer (make sure you have it on your lowest setting so it doesn't splatter the wax), start melting your crayons.

8.  Once the crayons start melting, you'll want to stand the canvas up more.  We did ours on the floor, so we just propped them up against the wall.

From left to right: Mine (when I did mine, I just had my canvas propped up on the jar, which gave me fatter drips), Awesome's (he picked his colors by how he wanted to see them mix, then wanted it hung horizontally to look like a machine gun!), and Bug's.

Now for the Crepe Paper Flowers

What you need:
Crepe Paper/Streamers
Glue
Scissors


Oops!  No Picture!
Stick your flower onto the glued area, then cut away the excess.


8 pkgs. 24 crayons - $2 (.40 each @ Walmart - back to school sale)
1 pkg. 8x10 canvas - $3.50 (each pkg. contains 3 canvases @ Walmart)
Elmer's Glue - FREE (I had some on hand, but it's super cheap, anyway)
Yellow Crepe paper/streamers - $1 (pkg. of 2 rolls @ Dollar Tree)
Frames - $17.50 (All found @ Hobby Lobby when they were 50% off. The boys' were unfinished wood that I painted, and were $5 each on sale. My barnwood frame was $7.50 on sale)
Total Cost for 3 pieces of art - $24 or $8 each!

If you make one of these, I'd love to see your creation!  Just email me or join my Flickr group!

Linking up to some of these parties, this one, and this under $20 party!

Related Posts with Thumbnails